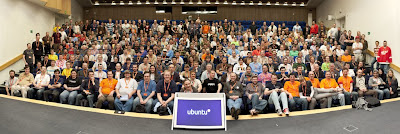
Due to the weather and the layout of the hotel grounds at the Ubuntu Developer Summit for 10.10.10 (Maverick Meerkat) it was impossible to take the group photo outside and from above (which I prefer). The next best place was the auditorium in which the daily plenary's took place. Unfortunately the room is quite wide and my 24mm objective didn't fit the bill (it was quite dark as well).
I decided to try creating multiple photos and stitch them together....note that the last time I made a stitched image was 13 years ago. I went into this assuming that there would be some Gimp plugin that would take of it, albeit with a lot of post-processing on my part.
I took the photos quite quickly, which turned out to be a mistake. The lights in the room were quite low and my autofocus didn't always do so well. Luckily I made several passes so I had enough data to create the final image. I had borrowed a tripod without which the task at hand would have been much more of a problem.
I searched the Ubuntu Software Center for "Panorama". The first result was "Hugin panorama creator".
Before I started Hugin I had no idea what to expect. What I discovered is that the interface is a bit complex and could definitely use some design love but the results the app produces are top-notch. The "Assistant" tab caught my eye so I tried that.
First, I used it to load my photos.
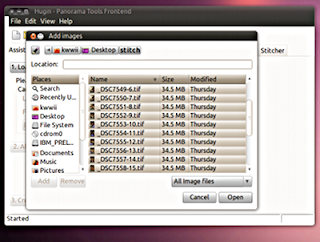
After loading the images it found control points and tried to compensate for vignetting and exposure differences between the photos. All of this happened automatically, so I sat back and watched it go through it's paces.
When finished a preview image is displayed with, among other toolbar buttons, a row of buttons just above the stitched image which allows to toggle the view of each image in the series. Very helpful if you aren't sure which images work best.

I used 10 16bit TIFF files at 12MP (34.5MB per image) and I ran all this on my Lenovo X60s so it took about 7 minutes to get this far. I was impressed with the speed, expecting it to take much longer considering the amount of data I fed it.
The Assistant did a lot but I still wasn't happy with the results so I closed the preview and searched for answers. I arrived at the Optimizer tab by simply going through all the tabs one by one (design needed!) until I found something which seemed to promise to do everything for me. Honestly, the interface is full of things I had no clue about. If I knew how it worked I am sure I could suggest some improvements.
Before I started Hugin I had no idea what to expect. What I discovered is that the interface is a bit complex and could definitely use some design love but the results the app produces are top-notch. The "Assistant" tab caught my eye so I tried that.
First, I used it to load my photos.

When finished a preview image is displayed with, among other toolbar buttons, a row of buttons just above the stitched image which allows to toggle the view of each image in the series. Very helpful if you aren't sure which images work best.

I used 10 16bit TIFF files at 12MP (34.5MB per image) and I ran all this on my Lenovo X60s so it took about 7 minutes to get this far. I was impressed with the speed, expecting it to take much longer considering the amount of data I fed it.
The Assistant did a lot but I still wasn't happy with the results so I closed the preview and searched for answers. I arrived at the Optimizer tab by simply going through all the tabs one by one (design needed!) until I found something which seemed to promise to do everything for me. Honestly, the interface is full of things I had no clue about. If I knew how it worked I am sure I could suggest some improvements.
In the Optimizer tab I selected "everything" from the drop-down and clicked on "Optimize now!". It goes through it's paces and presents a pop-up with information about what it changed and asks whether it should apply the changes. Since I didn't have the preview open I just clicked "Yes". This screams to me for a design change although the result was excellent.


The Exposure tab allowed me to optimize the photometric's of the images (which means, I again found something that seemed like it would automate the process). My camera was set to "auto white balance" so I selected "Low Dynamic Range, variable white balance" and clicked on "Optimize now!".

Again, all of the hard stuff simply worked. I didn't come away from this having learned details of creating panorama's or advance non-linear math although I will learn more about how to use Hugin (and report back soon with my results).
Last but not least I selected the "Stitcher" tab and selected "Stich now!". The results speak for the quality of this app. I was amazed at how well it turned out, and how easy it was :-)


This is a new version of the Ambiance theme on the screenshots? I see it's a little bit different from the current version.
ReplyDeleteExtremely well done, Ken! The image looks great ;-)
ReplyDeleteAnd thanks for the writeup. I'll definitely refer to this sometime in the future.
:-Dustin
nice photo, ken!
ReplyDeleteThe stitching is perfect. Parts of the image are out-of-focus but still it's an amazing panorama. With perfect focus I would prefer this over outside-from-above shots =)
ReplyDeleteWonderful! Was wondering which wide angle lens was been used, but the secret is well reveled /me try panoramic photos now :O)
ReplyDeletenice pic for the first time hugin. until now I've always used autostitch http://cvlab.epfl.ch/~brown/autostitch/autostitch.html wich works fine with WINE and needs no tinkering with any options
ReplyDeleteHugin is the easiest photo stitching program I've _ever_ used. I highly recommend it. Nice tutorial :)
ReplyDeletePanorama of my small Canadian city last summer: http://en.wikipedia.org/wiki/File:Panorama-of-peterborough-on.png